
Realm Factory Tutorial
Welcome to Realm Factory, a simple (and growing!) general purpose level editor for XNA games. This tutorial will get you started using Realm Factory in your XNA game!
Downloading and Installing Realm Factory
The current version of Realm Factory can be downloaded from here.
After you have downloaded the current version, updates will be automatically downloaded, so you won’t need to worry about constantly checking back for updates.
Setting up a Project
When you first open Realm Factory, you will be prompted to accept the End User License Agreement (which is a very typical EULA, basically stating “play nice, and don’t do anything dumb”). You must accept the EULA in order to use the program. The EULA will only be shown once. The next time you run the program, you won’t see it again.
When this is complete, you will be shown a dialog asking you if you want to start a new project or an existing one, shown below:
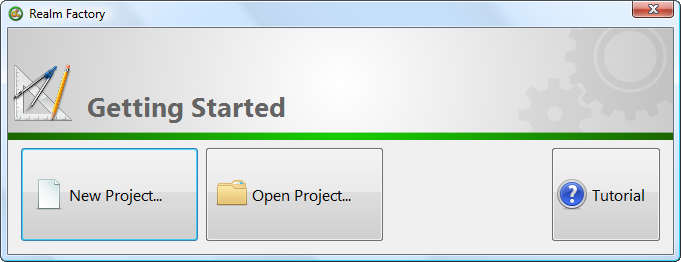
In the future, you can select Open Project… to quickly get back into a project that you had previously been working on and saved.
For this tutorial, though, we’re going to start a new project, so select New Project….
This will start the New Project Wizard, which is shown below:
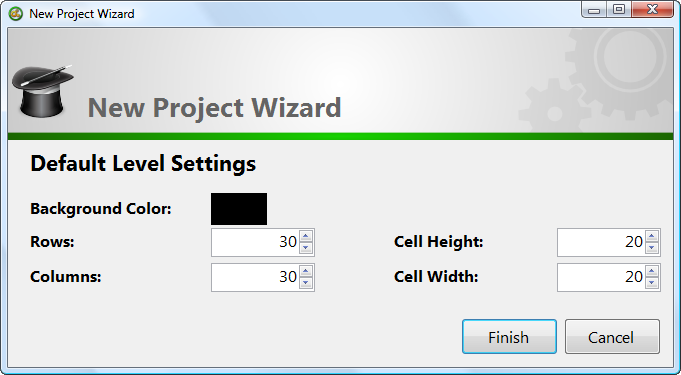
On this dialog, you will be able to select defaults for your grid-based levels, including the background color (which is what is displayed behind the level), the number of rows and columns in your levels, and the size (width and height) of each cell in the grid, measured in pixels.
A couple of things that you should keep in mind while selecting these defaults:
- You can change them any time you want, by choosing Project > Project Settings from the menu.
- Individual levels can have different numbers of rows and columns, and different sizes of cells. This just allows you to choose the defaults.
Creating a Tile Set
With our project defaults prepared, we’re ready to start defining the tiles that are a part of our game. Tiles are objects than can be placed inside any cell in a level.
In this version, all tiles are image-based, meaning you’ll load an image for each type of tile that you wish to add to any of your levels. These tile images can be created in any image editing program, like Paint.NET or Inkscape, both of which are free.
To add a new tile to your project, choose Project > Add Tile or press Ctrl + T. Browse to find the images that you want to use as a tile in your game. Note that by default, these images are what your XNA game will use for drawing the tiles, but that you will be able to use different images later, if you really want to. Once you have found the images, press the Open button, and a new tile will be added for each image, as shown in the example below:
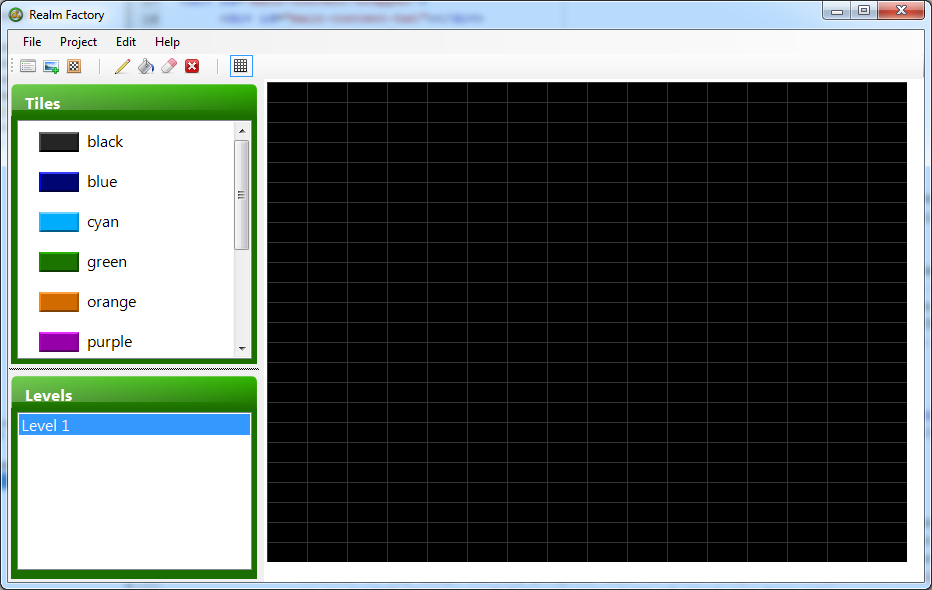
Note that you can add new tiles whenever you want, even after you have already started creating levels. You can also delete existing tiles by selecting them from the Tiles list and pressing Delete. You can also change the name that a tile has, or even the image that a tile is using by double-clicking on the tile in the Tiles list.
Creating Levels
By default a new, single level has been added to your project.
New levels can be added at any time, by choosing Project > Add Level or using Ctrl + L. By default, a new level will use the project defaults that you set for your project in an earlier step. A level’s settings, though, can be changed any time you want, by double-clicking on the level in the Levels list.
Adding tiles into your level is a very easy process. To do this, start by clicking on the level you are interested in editing. Click on the tile you want to add to your list. You now have several choices for how to add the given tile to your current level. The simplest tool to use is the Pencil Tool. The icon for this tool looks like this:

Now, click anywhere in the level to add the chosen tile to the level at that location. You can keep repeating this process of choosing tiles and clicking to place them until your level is the way you want it.
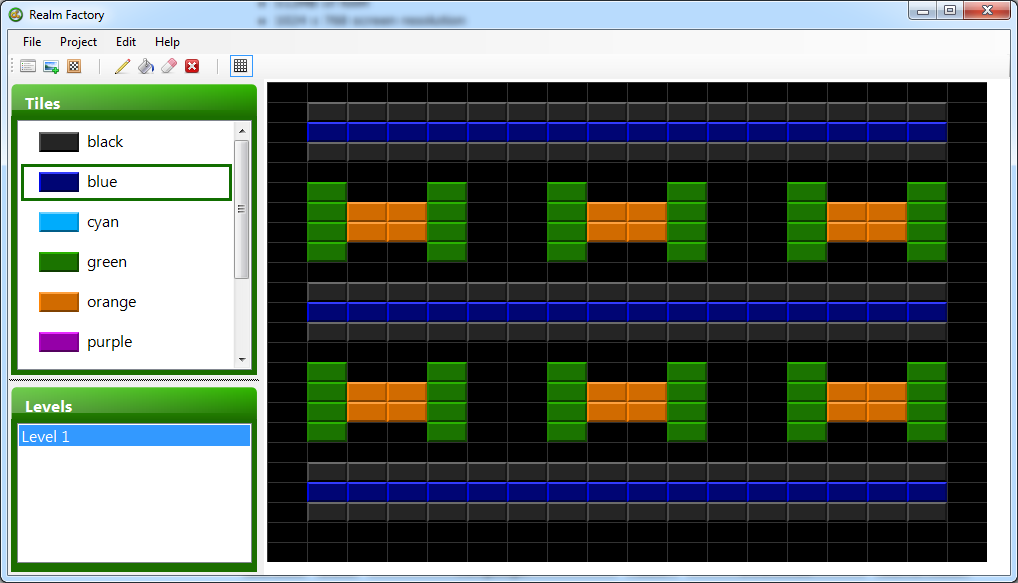
As an example, the image below shows a simple Breakout style level, created using the Pencil Tool:
There are two other tools that are worth taking a quick look at. The Paint Bucket Tool can be used to fill large regions with the same tile. This fills the region, starting with the location you click on, moving outwards until a boundary is met.
The Eraser Tool works just like the Pencil Tool, only instead of placing any particular tile, the current tile is removed, leaving the cell empty.
The combination of these three tools makes it quick and easy to make any level you can dream up.
A Few Extra Things…
Undo/Redo
Realm Factory has an undo/redo system that you can use if you make a mistake. To undo a change, simply choose Edit > Undo or press Ctrl + Z to go back to the previous state. You can redo actions that have been undone using Edit > Redo or by pressing Ctrl + Y.
Submitting Bugs, Feature Requests, and Feedback
Since this program is a beta, and you’re able to use it for free, I hope, in exchange, that you’ll take the time to submit any bugs that you run into, as well as send in any feature requests that you think are missing (note, though, that feature requests aren’t typically implemented during a beta, but rather, in future versions). Any other feedback that you have is also greatly appreciated, either positive or negative.
Because this is important to the future of the program, I’ve gone out of my way to make this as easy as possible to do. Each of these three items can be accessed on the Help > Submit… menu.
Please take the time to report anything you think may be of value. Working together, we can make this program truly awesome!
Using it in your XNA Game
Now that we’ve covered all of the important things in Realm Factory itself, we’re ready to take our level set and load it into an XNA game! The content pipeline in XNA makes this really easy to do.
Download the DLLs
The first step will be to download the DLLs that are a part of Realm Factory. (Note that when a new update of Realm Factory comes out, that you may need to update to the newest DLLs. This will include two DLLs that you’ll need to attach to your XNA game.
Set Up References
To tell your XNA game about the right DLLs, you will need to add a reference to your main game, and a second reference to your game’s content project.
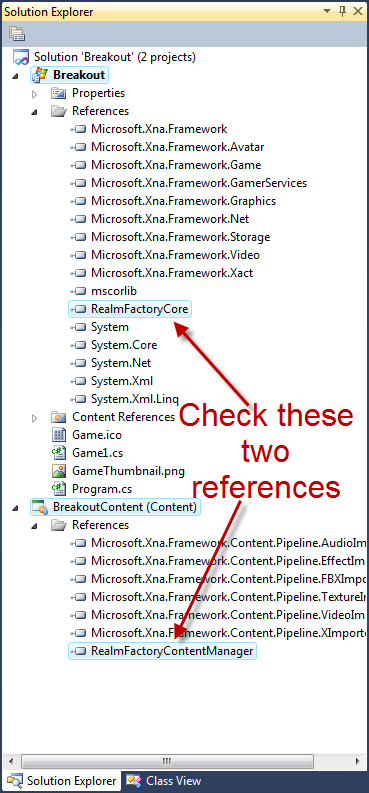
In the Solution Explorer, in your main game project, right click on the References node and choose Add Reference. Browse and find RealmFactoryCore.dll that you downloaded before. This adds a reference to the RealmFactoryCore.dll to your main game, allowing you to use the classes it contains in your main game.
The second reference will need to be added to the content project. This is a different spot than before! Find your content project to do this. By default, the name of your content project will be the same as your main game project, but with ‘Content’ stuck on the end. So if you called your game ‘Breakout’, the content project will be ‘Breakout Content (Content)’.
So in the content project, right click on the References node, and choose Add Reference. Browse and find RealmFactoryContentManager.dll, and select it to add a reference to it.
You’ll now have the two references added, and you should be good to move forward. Your Solution Explorer should look something like the image below at this point:
The C# Code
You can now add any level sets that you’ve created (.realm files) to your content project (right click on the content project and choose Add > Existing Item) and XNA Game Studio will automatically know to load your level sets through the DLLs, giving you access to them in your game!
Once you add a .realm file as content to your game, you can load it in through the content pipeline.
I’d recommend creating a LevelSet object to store your complete level set, as well as a Level object, to store the current level, both as instance variables to your game.
You can keep track of your level set, and the current level anywhere you want, but to add them as instance variables to your main game class, add the following two lines of code, just inside your main game class (Game1.cs, unless you’ve changed it) outside of any methods:
private LevelSet levelSet;
private Level currentLevel;
In the LoadContent method, you can load your level through the content pipeline, like usual:
levelSet = Content.Load<LevelSet>("TutorialProject");
One thing that is very important to keep in mind is that your level set contains only level definitions, not actual playable levels. If you modify the level definition as a result of the player destroying something, then you won’t be able to recover the original level without reloading it through the content pipeline. Instead, you should create a level instance from the level definition, using something like this:
currentLevel = levelSet.GetLevel("Level 1").CreateInstance();
You can do this in the LoadContent method, or really, any time you want to start off a new level.
To wrap up this tutorial, let’s take a quick look at some simple code to draw our level. Note that you don’t need to necessarily use this code, or even draw the level with the sprites that were chosen in Realm Factory. You can do whatever you want. At any rate, here’s some sample code to get you going, drawing the current state of your level:
protected override void Draw(GameTime gameTime)
{
    GraphicsDevice.Clear(Color.CornflowerBlue);

    Vector2 topCorner = new Vector2(100, 100);
    float scale = 1f;

    spriteBatch.Begin();

    for (int row = 0; row < currentLevel.Rows; row++)
    {
        for (int column = 0; column < currentLevel.Columns; column++)
        {
            Tile tile = (Tile)currentLevel.GetTile(row, column);
            if (tile == null) { continue; }

            Texture2D texture = tile.Texture;

            spriteBatch.Draw(texture, new Rectangle(
                (int)(column * currentLevel.CellSize.X * scale),
                (int)(row * currentLevel.CellSize.Y * scale),
                (int)(currentLevel.CellSize.X * scale),
                (int)(currentLevel.CellSize.Y * scale)), Color.White);
        }
    }

    spriteBatch.End();

    base.Draw(gameTime);
}
That wraps up our quick introduction tutorial to Realm Factory! If you’re still having trouble, feel free to post a question in the forum, or contact me for further information. Thanks again for taking the time to check out Realm Factory! Best of luck in your XNA game making!